If it solidifies completely, sand it smooth. Sand all surface areas with the grain using 100-grit paper. To make sure no bits of dust mar the finish, vacuum the cabinets inside and out, then rub them down with a tack fabric to catch any particles that the vacuum misses. Dee says, "Hand sanding is the very best strategy on oak since you can press the paper into the open grain, which a power sander or sanding block will miss out on. Cabinet Painting Contractors 28202." When using a tack fabric, unfold each new cloth totally, down to one layer, then crumple it to get the best dust collection surface area.
However they just sink into open-grained woods such as oak, ash, mahogany, or hickory. Brushing putty, the pudding-thick, oil-based covering Dee utilized on these oak cabinets, fills the grain as it primes the wood. A couple of caveats: It needs to be applied with a good-quality nylon-polyester brush, which you'll need to discard after each coat.
Beginning at the top of the cabinet, brush on the primer or brushing putty throughout the grain, then "tip off" pass the brush lightly over the wet finish in the direction of the grain (Cabinet Painting Contractors 28206). Always tip off in a single stroke from one end to the other. Give it a day to dry.
Sand any profiled surfaces with a medium-grit sanding sponge. When you're done, whatever needs to be glass-smooth. Follow the underlying structure of the cabinet or door with the brush. Where a rail (horizontal piece) butts into a stile (vertical piece), for instance, paint the rail first, overlapping somewhat onto the stile.
Little Known Questions About How To Finish Cabinet Painting Contractors 28277 Your Unfinished Cabinet Doors how to refinish cabinets with paint And Drawer Fronts.
Where a stile butts into a rail, paint the stile first. Squeeze a thin bead of latex caulk into any open joints. Pull the pointer as you go, then smooth the caulk with a damp finger. Fill any small damages, scratches, or dings with vinyl spackle, smoothed flat with a putty knife.
Spot-prime the spackle, and any areas where the brushed-on primer is "burned through," with a spray can of fast-drying oil-based primer. Wait an hour, then sand the guide gently with 280-grit paper. Vacuum all surfaces, and wipe with a tack fabric. The hole in a caulk tube's tip need to be no bigger than the idea of a sharp pencil.
Work from top to bottom, applying the paint across the grain, then tipping it off with the grain. For cabinet interiors, apply the paint with a smooth-surface mini roller, which leaves a minor orange-peel texture. Sand all surfaces with 280-grit paper, then vacuum and tidy with tack fabric. Cabinet Painting 28209. For the last coat, break out a new brush.
Brushes choose up dust, so always pour paint into a separate container to avoid contamination of the paint in the can. If any paint is left over, pour it back into the can just through a fine-mesh strainer. The technique for prepping and painting doors, drawers, and shelves is the exact same as on the cabinets, except that all the work is done on a table to decrease the chance of drips, runs, and sags. Cabinet Painters 28202.
Fascination About Pro Secrets For Painting Kitchen Cabinets - This Old House
Follow the exact same prep series when it comes to cabinetsclean with deglosser, fill the holes, sand, vac, and tackand the very same priming sequence: in this case, two coats of brushing putty. Smooth the flat surface areas on the panel and the frame with a random-orbit sander. On bevels or profiles, apply elbow grease and a medium-grit sanding sponge.

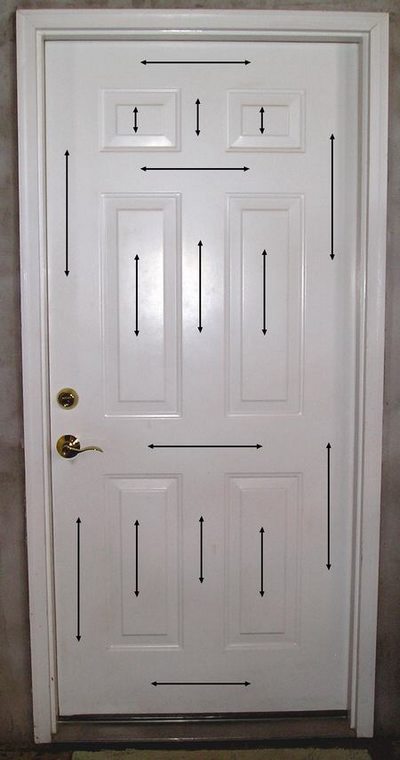
When priming or painting paneled doors, brush in the following sequence to get the best-looking surface area in the least amount of time: start with the area around the panel, then do the primary field of the panel, then finish with the stiles and rails around the edges. As you go, wipe up any paint that ends up on nearby dry surfaces. Cabinet Painters 28269.

After vacuuming and tacking all the surfaces, spray a fast-dry primer on any areas with spackle or bare wood where the sandpaper "burned through" the primer. Wait an hour before sanding - Cabinet Painting 28206. Get rid of all dustfirst with a vacuum, then with a tack clothand use the finish coat. Idea it off with the grain.
Vacuum and tack every piece, then brush on the final coat. To prevent drips on outdoors edges, pull the brush towards them. To avoid drips in corners, first dump the brush by scraping off the paint, then paint by pulling the brush away from the corner. If a drip laps onto a dry surface, clean it up instantly.
Some Known Questions About How To Get A Smooth Professional Paint Finish On Furniture ....
John Dee, a perfectionist, chooses to do one side at a time, keeping the faces flat so they do not get runs. But that's 2 days of drying time per doorone day per side. Here's his approach for painting both sides in a day. Twist two screw hooks into holes drilled in an inconspicuous door edge (the lower edge for bottom cabinets, the upper edge for top cabinets).